

Photo by Paul Esch-Laurent on Unsplash
Taming the Beasts: Understanding const, let, and var in JavaScript
Avoid JavaScript Errors: A Guide to Using const, let, & var


Table of contents


No headings in the article.
Ever stare at code and feel like you're deciphering ancient scrolls? Yeah, me too. That's why I started this blog! Here, we take complex tech concepts and break them down into bite-sized pieces – no PhD required. We'll navigate the confusing bits together, realizing they were just a piece of cake all along. So, grab a metaphorical cookie (or your favourite coding snack) and let's dive in!
Today we'll delve into the fascinating realm of JavaScript, a programming language that powers many of the websites and interactive features you encounter online. Today's topic is all about Variables, the essential building blocks for storing and manipulating data in your JavaScript programs.
Imagine variables as little boxes where you can store information your program needs to work with. These could be numbers, text, or even more complex data structures. But unlike a regular box, you need a label to identify and access these variable "boxes" within your code.
Think of a computer's memory as a giant storage room. Variables act as labels that help you keep track of where specific pieces of information are located in this vast memory space. This allows your program to efficiently find and use the data it needs.
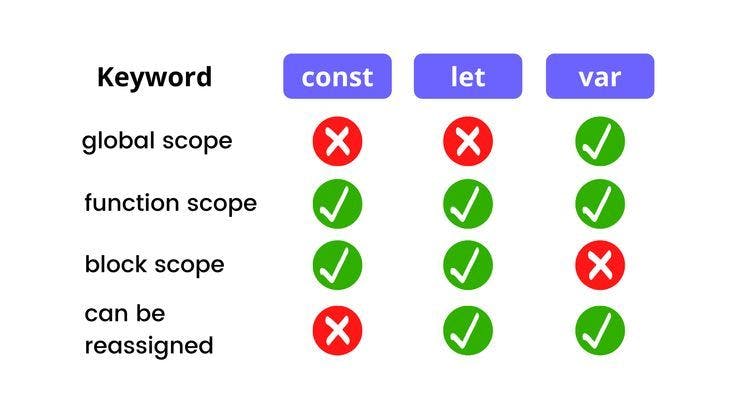
JavaScript offers three main ways to declare variables: var, let, and const. These keywords determine how variables behave and interact with your code. Let's explore each one:
1. var (The Old Reliable):
This was the traditional way to declare variables in JavaScript.
Think of it as a simple label that points to a data box.
The downside?
varcan sometimes lead to confusion because variables declared withvarcan be accidentally overwritten later in your code.
2. let (The New Sheriff in Town):
Introduced in a later version of JavaScript (ES6),
letprovides a more organized and predictable way to declare variables.It creates a local scope for the variable, meaning it's only accessible within a specific section of your code. This helps prevent accidental overwrites from other parts of your program.
3. const (The Constant Companion):
If you have data that should never change within your program,
constis your best friend.It declares a variable that holds a fixed value, just like a constant mathematical value (e.g., pi). Once assigned a value, a
constvariable cannot be reassigned later in your code. This ensures consistency and prevents unintended modifications.
Here's a simple example to illustrate the difference:
// Using var (can be overwritten later)
var age = 25;
age = 30; // This is allowed with var

// Using let (restricted scope)
let name = "Alice";

// Using const (fixed value)
const PI = 3.14159;
PI = 3.14; // This will cause an error with const
Choosing the Right Tool for the Job:
Use
letfor variables whose values might change throughout your program.Use
constfor variables that hold constant values that should never be modified.While
varis still technically usable, it's generally recommended to avoid it in favour ofletandconstfor better code organization and fewer potential errors.
By understanding these variable declarations, you'll be well on your way to writing cleaner, more maintainable JavaScript code!
Here is a recap in image form.
I hope this blog serves as a valuable introduction to variables in JavaScript. Feel free to leave comments or questions below, and happy coding!